Check-In
Check-In allows you to keep track of who attends each event.
After the event, you can use the check-in record to adjust registrations and contact attendees.
Attendance records cannot be changed by attendees after checking in. Attendees will also not be able to check into past events.
Watch this video to learn how to do check-ins:
Technical Requirements
Host/Greeter/Usher
| Requirement | Host Check-In | Self Check-In | Walk-In |
|---|---|---|---|
| Phone | Yes | — | No |
| Tablet, Laptop or Desktop | No | — | Yes |
| Internet Connection | Yes | — | Yes |
Attendee
| Requirement | Host Check-In | Self Check-In | Walk-In |
|---|---|---|---|
| Phone | Yes | Yes | No |
| Internet Connection | Yes | No | No |
Before the Service
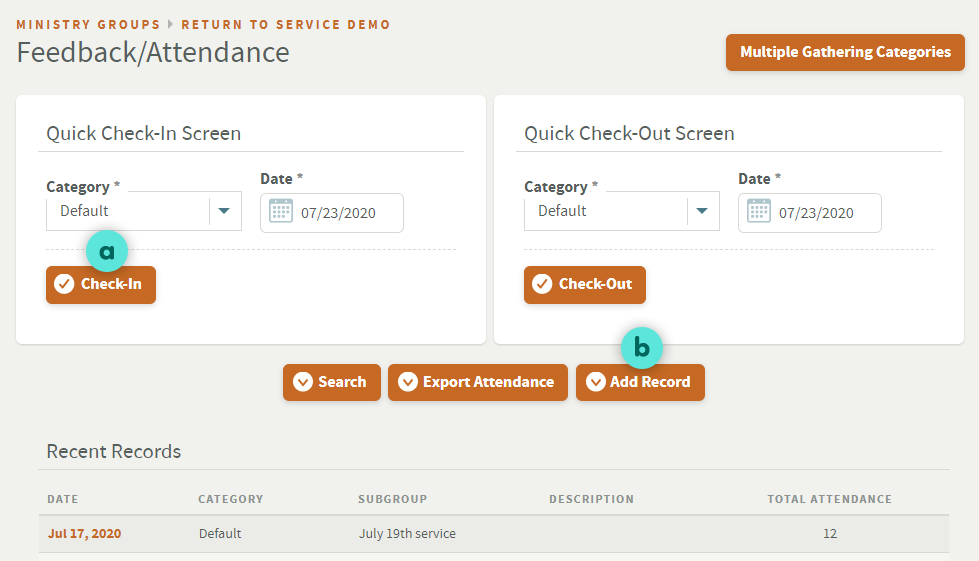
To enable check-in for the service, the attendance for the day will need to be created through Church Tools.
Attendees will not be able to check in until the attendance record is created for the day.
- Login to Church Tools, go to Ministry Groups and select the desired Ministry Group.
- Select Feedback/Attendance.
- Create an attendance record:

- If you are accepting walk-in registrations, select a Check-In in the “Quick Check-in Screen” panel.
- Otherwise, select b Add Record
- In the panel that appears at the bottom of the page, select the Subgroup you wish to open check-in for, then select Add.
- On the next screen, select Save to open the attendance record.
You can use b Add Record to set up check-in before the day of the event — just set the date to the future. Check-in for that date will only open on the day of the event.
Host Check-In
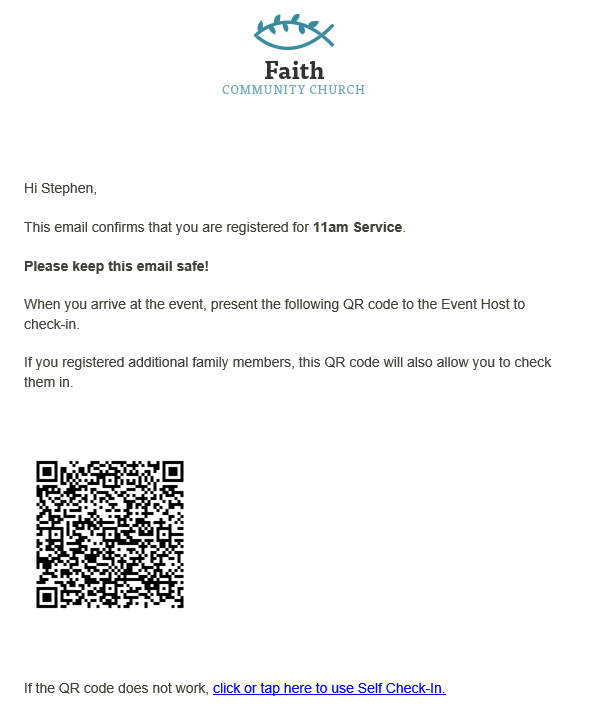
 This contactless method uses the phone camera of the host/greeter/usher to scan a QR code on the attendee’s device or printed email.
Before using this method, the host/greeter/usher will need a way to scan a QR code from their phone. The phone’s camera app should be able to scan the QR code. If not, install a QR code scanner app from the app store.
The host/greeter/usher’s phone will need access to the internet to complete the check-in process.
The QR code sent to the HOH (Head of Household) will check in everyone registered in their family.
- Upon arrival, the attendee opens the confirmation email and scrolls to make the QR code visible.
- When the host scans the QR code, they will be directed to a webpage that asks them to confirm if all the attendees are present.
- If not all attendees are present, the attendee will need to tap the link to change who is present.
- If a waiver has been added, it will appear on the page as well.
- A confirmation message will appear once the attendee is checked-in.
Self Check-In
This no contact method allows attendees to check in themselves on their device.
The attendee’s phone will need access to the internet to complete the check-in process.
The link sent to the HOH (Head of Household) can check in everyone registered in their family, with the option to deselect family members who are not present.
Using the Confirmation email
- Upon arrival, the attendee opens the confirmation email and taps the link in the email.
- A webpage will appear asking if everyone is present. If not, the attendee can change who is present.
- A confirmation message will appear once the attendee is checked-in.
Using Connect
- After logging in to Connect, go to Events tab.
- In the Registered Events list, the attendee selects the event they would like to check into.
- A webpage will appear asking if everyone is present. If not, the attendee can change who is present.
- A confirmation message will appear once the attendee is checked-in.
If a waiver has been added, the attendee will be asked to confirm that they accept the statement. They will only be allowed to check in if they accept the statement.
Walk-in Registration
This contactless method allows visitors, congregants who have not registered, or those without internet-connected devices to check in for an event.
The capacity limit for the subgroup is ignored when using this method. If a capacity is set, please check the number of attendees in the Recent Records list prior to registering a walk-in attendee.
- Login to Church Tools, go to Ministry Groups and select the desired Ministry Group.
- Select Feedback/Attendance.
- Select Check-In in the Quick Check-in Screen panel.
Checking in a registered attendee
The “Members” panel lists everyone who has registered for an event in this Ministry Group.
- To check in someone who has registered, search for the name, then select Check-In for the desired event time.
- For example, to check in “Olivia-Rose Li” to the 11am Service, search for her name, then select Check-In for the name labelled 11am Service.

Checking in a non-registered congregant or visitor
- In the “Add Member” panel, select the correct event time under Subgroup.
- Look up an existing contact using their name to check if the attendee already has a Contact record. If not, fill in the First/Last Name.
- Click Save to add their registration.
Related Articles
Couldn't solve the problem?
Monday – Friday
8:00am to 4:30pm (Pacific Time)
(Closed Statutory Holidays)
